
Embroider your very own tote bag with my pre-printed Stitch Sampler Tote Bag

I use the sewing machine a lot but truthfully the machine just cannot compete with the beauty of something that you have hand stitched yourself. Hand sewing can be so much fun and not to mention very good for relieving stress and anxiety. Focusing on stitching can get you into a healthy flow state of mind that proves very healthy and enjoyable.
If you are looking to practice some traditional hand embroidery stitches or if you fancy getting into embroidery but don't know where to start... this tote bag could be just what you are looking for.
If you'd like to have a go grab a Tote Bag over in my Teemill shop and find full instructions below.
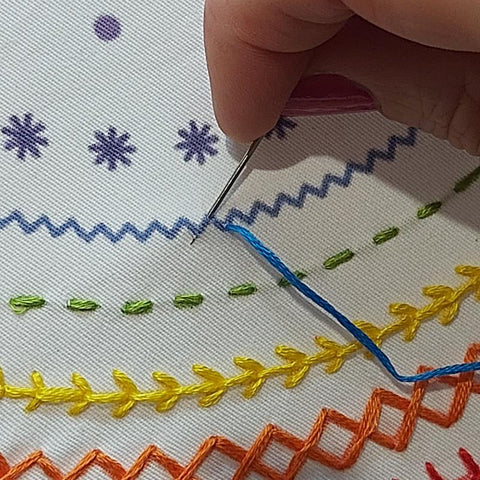
I have designed a circular print of 8 of my favourite basic embroidery stitches so that you can learn as you go following the print as a guide.


The tote bag is available in white or black and comes with a pre-printed design so there is no tricky tracing and placement for your to figure out.
Choose your own coloured threads or follow one of my coloured templates like the 'Somewhere over the rainbow' sample.

Before you get started you will need the following kit:
- Betty Stitch Sampler Tote Bag
- 10" embroidery Hoop
- Sewing needle
- Stranded cotton embroidery threads
- Snips
- Thimble

Top Tips
- Use an embroidery hoop to keep your fabric taught whilst you stitch.
- Start every separate stitch with a knot on the back side.
- Use all 6 strands of your thread for a lush chunky finish.
- Put your hand on the inside of the tote bag whilst you stitch to stop from stitching the bag closed.
If you are ready to sew let's get started
Firstly attach your embroidery hoop, outer ring on the front and smaller inner goes inside the bag.
You can start stitching wherever you like but I started with the outer ring first and worked my way into the center.
1> BLANKET STITCH
An oldie but goodie! Work along the main outer line jutting in and looping back under your stitch.


2> CROSS STITCH
Stitch the whole way round diagonally going one way then make your way back sewing the opposite way to create the cross.


3> FLY STITCH
Tricky to get started but very satisfying! stitch along the main line, stitch across and then duck back up under your crossed stitch and pull to create the v.


4> RUNNING STITCH
In out in out the most simple and common stitch.

5> ZIGZAG
Working diagonally stitch all the way around the ring one way, then work your way back working the opposite direction.


6> DAISY
Really easy and effective, work from one side of each line to the other crossing in the center.


7> FRENCH KNOT
Eek the hardest stitch but the most fun to try! Come up through the back, wrap 3 times around the needle then dive back in the center and pull tight.


8> BACKSTITCH
Backstitch is great for sewing lettering, start with a long running stitch then double back to create a back stitch. Note this this stitch uses lots of thread.


And there you have it! If you completed each stitch you should now have a lovely tote bag to show off your fabulous stitching.
How long did it take you? I would love to know how you found my instructions and what colours you used. Drop a comment below or share with me on Instagram @frecklesandcocraft
This project would also make a fabulous gift for a crafty friend.
Happy Stitching everyone!


